# simple-cache
**Repository Path**: wzdszh/simple-cache
## Basic Information
- **Project Name**: simple-cache
- **Description**: 自定义注解实现简单的缓存
- **Primary Language**: Java
- **License**: Apache-2.0
- **Default Branch**: master
- **Homepage**: http://120.76.201.118:8773/
- **GVP Project**: No
## Statistics
- **Stars**: 0
- **Forks**: 1
- **Created**: 2023-03-21
- **Last Updated**: 2023-11-14
## Categories & Tags
**Categories**: Uncategorized
**Tags**: None
## README
## 🐶背景:
> - 我们在写web项目的时候,
> - 当大量的请求进来会导致我们数据库压力过大,
> - 所以我们需要加入缓存来减轻数据库的压力,但是现在市面上的很多缓存框架配置太复杂,
> - 所以该框架只需要一个`@RedisCache`注解就可以实现redis的缓存功能

**所以该框架就叫`simple-cache` :简单的缓存**
## 🐭介绍:
**`simple-cache 1.x` 是使用`redis`作为数据库缓存系统,使用`自定义注解`配合`Spring的Aop功能`实现方法的缓存,使用`restful风格`支持`get`请求,根据`请求的参数和key`来分类唯一的请求key**
## 🐹代码托管
**[Gitee](https://gitee.com/antopen/simple-cache)**
## 🐰安装
**simple-cache 1.x 版本基于 JDK11,所以安装集成 simple-cache 1.x 要求如下:**
> - JDK 11+
> - Maven or Gradle
#### Maven:
```xml
io.gitee.antopen
simple-cache
最新版本
```
> [最新版本](https://repo1.maven.org/maven2/io/gitee/antopen/simple-cache/)
## 🐺快速开始
> [快速开始实例项目](https://gitee.com/antopen/simple-cache-quickstart)
#### 初始化工程
**创建一个空的 Spring Boot 工程**
```xml
org.springframework.boot
spring-boot-starter-parent
2.7.6
```
**添加依赖**
**引入 `spring-boot-starter`、`spring-boot-starter-test`、`simple-cache`、`spring-boot-starter-web` 依赖:**
```xml
org.springframework.boot
spring-boot-starter
org.springframework.boot
spring-boot-starter-test
test
org.springframework.boot
spring-boot-starter-web
io.gitee.antopen
simple-cache
1.0.1
```
## 🐸配置
**在 `application.properties` 配置文件中添加 redis 的相关配置:**
```bash
server.port=8773
spring.redis.host=127.0.0.1
spring.redis.database=0
spring.redis.port=6379
```
**在 Spring Boot 启动类中添加 `@ComponentScan`注解,扫描 `com.masiyi`和`本项目(例如:com.example)`文件夹:**
```java
package com.example.springbootdemo;
import org.springframework.boot.SpringApplication;
import org.springframework.boot.autoconfigure.SpringBootApplication;
import org.springframework.context.annotation.ComponentScan;
@SpringBootApplication
@ComponentScan({"com.masiyi","com.example"})
public class SpringbootdemoApplication {
public static void main(String[] args) {
SpringApplication.run(SpringbootdemoApplication.class, args);
}
}
```
## 🐯编码
#### 编写controller类 Test.java
```java
package com.example.springbootdemo.controller;
import com.example.springbootdemo.service.TestService;
import org.springframework.beans.factory.annotation.Autowired;
import org.springframework.web.bind.annotation.GetMapping;
import org.springframework.web.bind.annotation.RequestParam;
import org.springframework.web.bind.annotation.RestController;
/**
* @Description TODO
* @Author masiyi
* @Date 2022/12/21
**/
@RestController
public class Test {
@Autowired
private TestService testService;
/**
* 不走缓存
* @return string
*/
@GetMapping("/testnocache")
public String testnocache() {
return testService.testnocache();
}
@GetMapping("/test")
/**
* 走缓存
* @return string
*/
public String test() {
return testService.test();
}
/**
* 缓存带参数方法
* @return string
*/
@GetMapping("/testParams")
public Object testParams(@RequestParam String name,@RequestParam String sex) {
return testService.testParams(name,sex);
}
}
```
**一共有三个方法,`不走缓存方法`,`走缓存方法`,`缓存带参数方法`**
#### 创建对应的service类
```java
package com.example.springbootdemo.service;
import com.alibaba.fastjson.JSONObject;
import com.masiyi.simplecache.annotation.RedisCache;
import com.masiyi.simplecache.util.RedisUtils;
import org.springframework.beans.factory.annotation.Autowired;
import org.springframework.stereotype.Service;
import java.util.Random;
import java.util.UUID;
/**
* @Description TODO
* @Author masiyi
* @Date 2022/12/21
**/
@Service
public class TestService {
@Autowired
RedisUtils redisUtils;
@RedisCache(key = "test")
public String test() {
return UUID.randomUUID().toString();
}
public String testnocache() {
return UUID.randomUUID().toString();
}
@RedisCache(key = "testParams",expire = 100)
public Object testParams(String name, String sex) {
JSONObject jsonObject = new JSONObject();
jsonObject.put(name, UUID.randomUUID());
jsonObject.put(sex, new Random().nextInt(2));
return jsonObject;
}
}
```
#### 启动项目访问三个接口
> http://localhost:8773/test
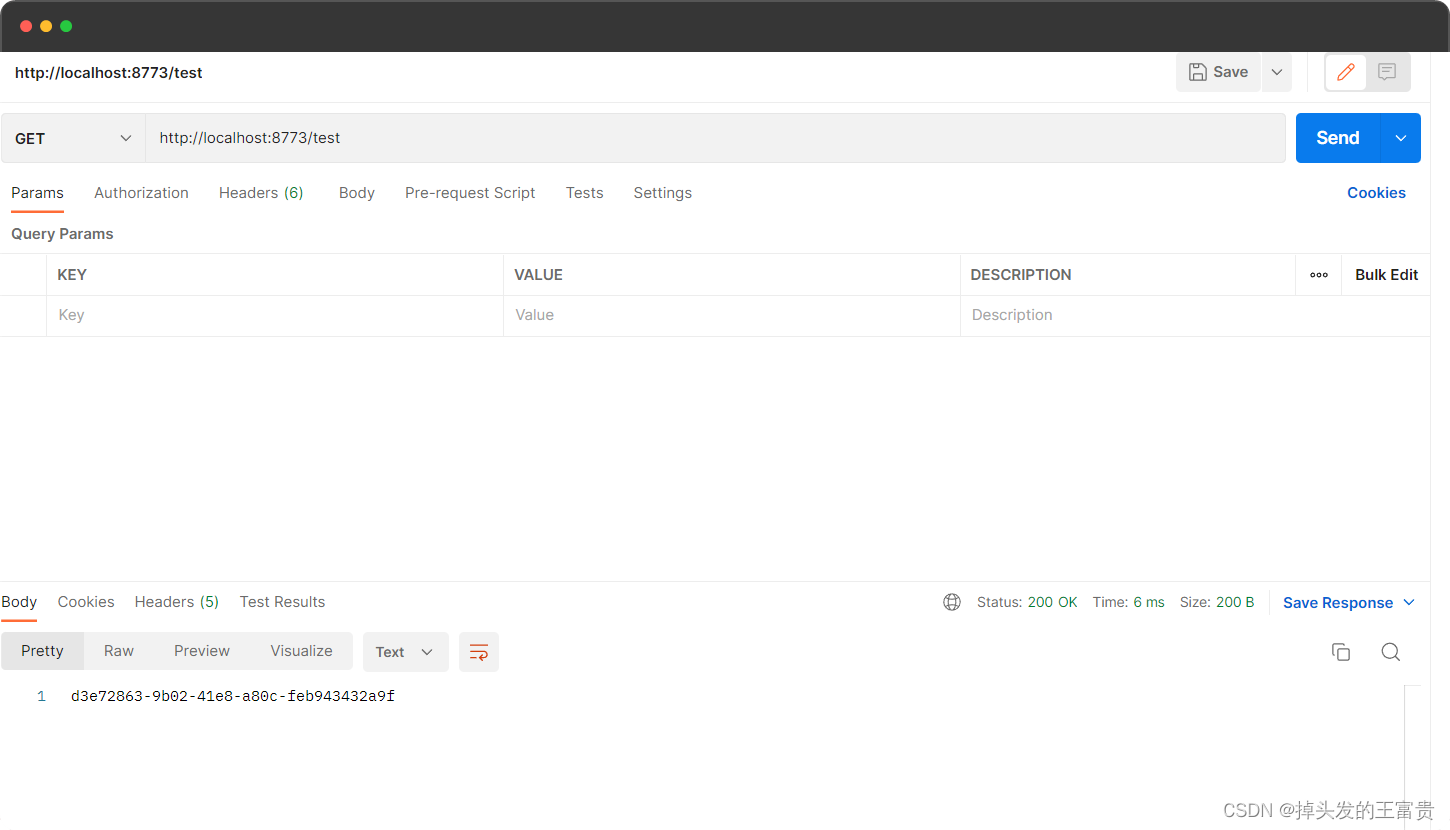
**访问两次返回结果都是一样的**
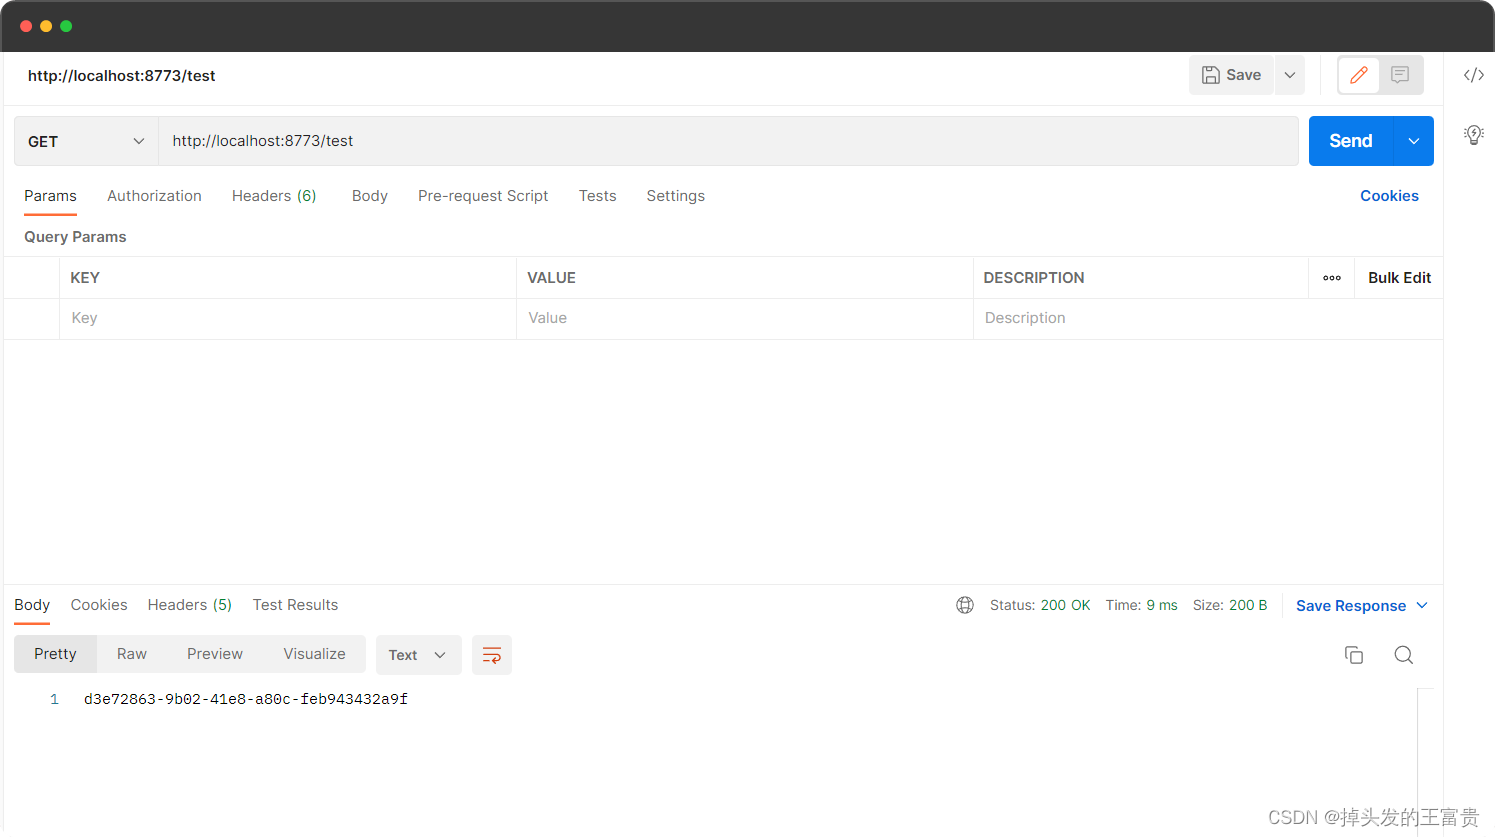
**因为走了缓存**
> http://localhost:8773/testnocache
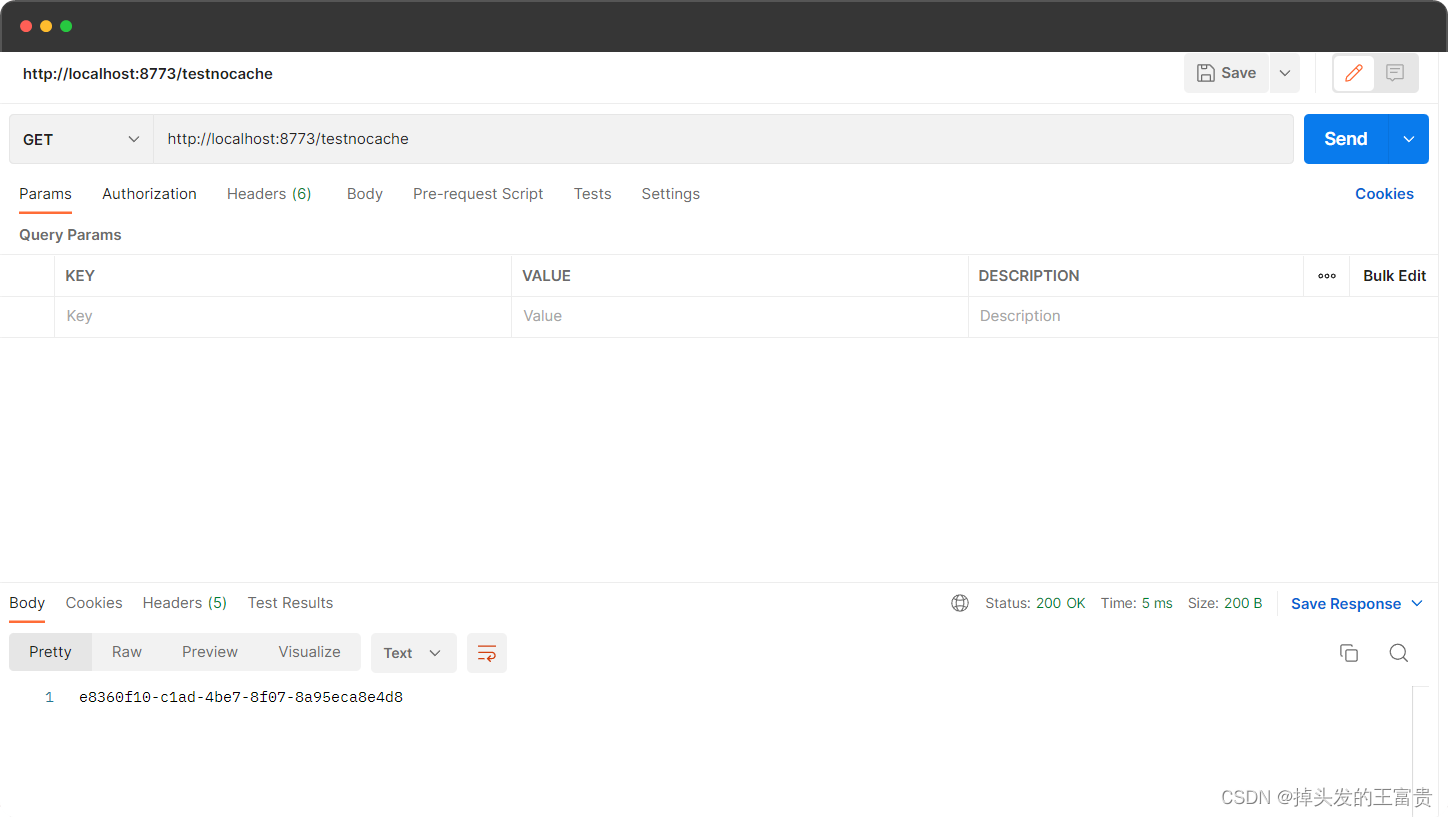
**两次结果不一样**
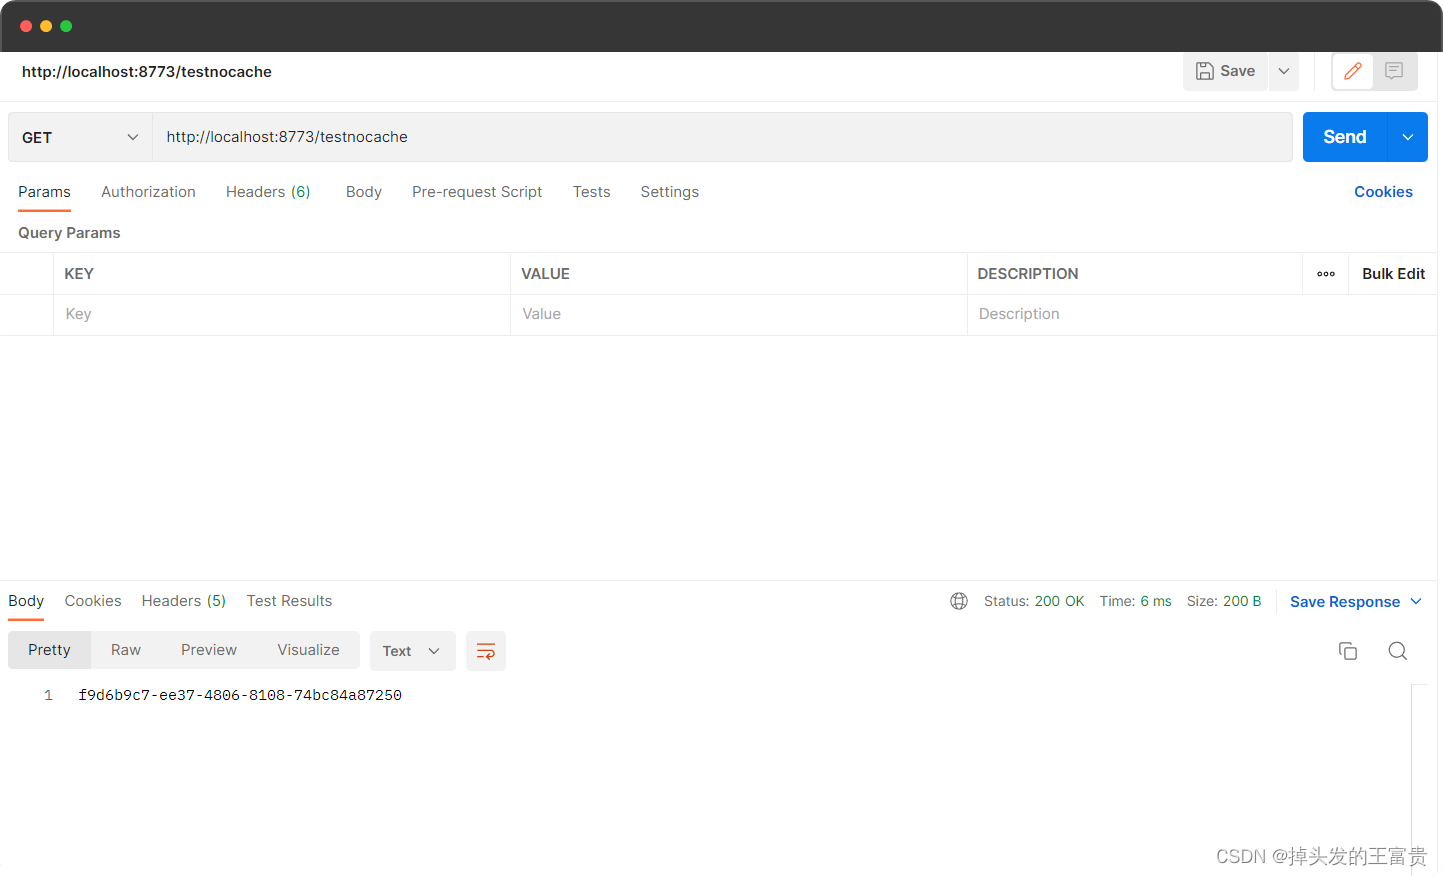
**因为没有走缓存**
> http://localhost:8773/testParams?name=王富贵&sex=男
**带参数访问**
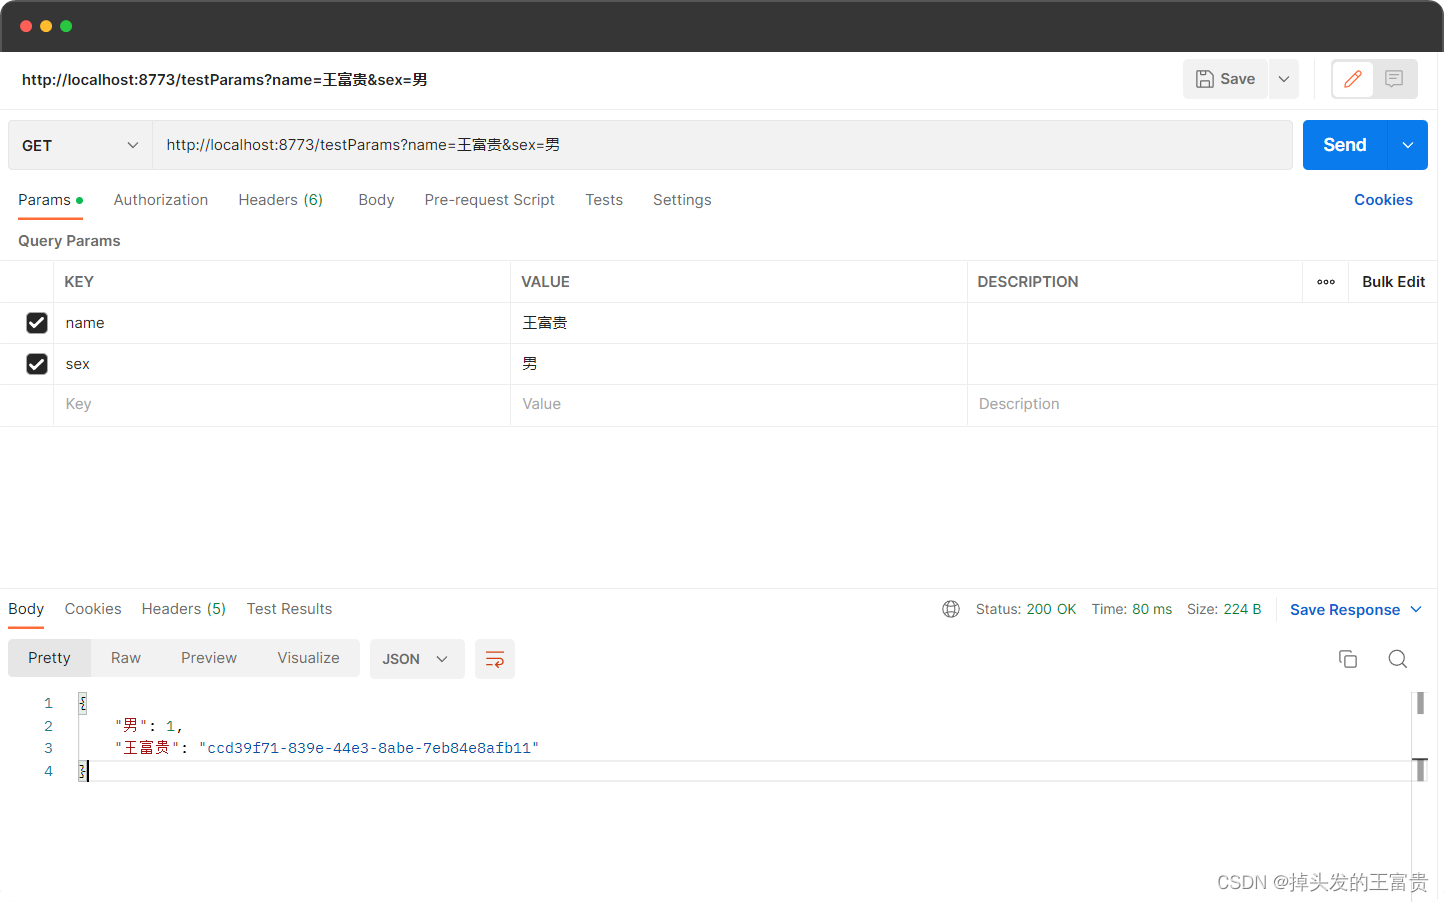
**如果参数不相同,返回结果不相同,因为`缓存的key`不同**

**如果参数相同,返回结果则相同,因为`缓存的key`相同**

## 🐨注解
#### 本文将介绍 simple-cache 注解包相关类详解(更多详细描述可点击查看源码注释)
> 注解类包源码:👉
> [simple-cache-annotation](https://gitee.com/antopen/simple-cache/tree/master/src/main/java/com/masiyi/simplecache/annotation)
|属性|类型|必须指定|默认值|描述
|--|--|--|--|--|
| key| string | 是 | "" | 缓存的key,可以自定义|
| expire| long| 否 | 86400秒(一天) | 缓存的时间,可以自定义|